I had been very down over the last week because I was looking at Motors. A single phase 3/4 HP electric motor is running anywhere from 159.00 to 289.00. That's way outside my budget for this plucker. I didn't know what I was going to do. Fortunately, I am married to a genius!
Last year our A/C broke down and we had to replace the fan and motor. The fan was in shards, but the motor appears to still work. At least my husband got it to working last night. So now I have a motor and the plucker project can continue.
We made great progress on it over the last week. I say "We", but Roger and the boys have done most of the hard work. Pulling those fingers through the body and the featherplate are a booger! I still have to order some more fingers, but we should be closing in. It's a good thing too. One of our friends is ready for it to make it's debut.

Click to join nikkischickens
Tuesday, May 25, 2010
Thursday, May 20, 2010
The wonders of crushed limestone
My chicks got sick this week. I lost one of my Black Bhramas and the others were all having very loose watery white filled stools. Everyone on the groups agreed that it was probably Coccidosis and that if I didn't do something quick I would lose about half of them. They told me to clean the coop out, put down a layer of powdered lime, and fresh hay. So that is exactly what I did. I also stopped by Tractor Supply and got a new water jug and took away their auto waterer. Even putting it up on the tire in the pen didn't keep the silly ducks out of it, and I'm pretty sure that is what got them sick in the first place.
So they are all doing better now, but I have to express my joy and amazement at finding crushed limestone. Ever since I raised those Cornish Cross, I have had a problem with ammonia build up in that coop. I leave the windows open and clean it out regularly, but it will still knock you over on a hot day. It was bad last night, because they had all had diarrhea. I started putting that limestone down and by the time I was done, they ammonia smell was GONE! I even took the remainder of the bag and spread it in the yard. It works wonders for odor. I am so happy. I didn't use the pure lime, I was afraid it would burn their feet. I used crushed limestone that I got at Orscheliens. It's really cheap, 4$ for a 50lb bag. Even with spreading it in the yard and the coop I didn't use the whole bag. This is going to be a regular staple for me now.
So they are all doing better now, but I have to express my joy and amazement at finding crushed limestone. Ever since I raised those Cornish Cross, I have had a problem with ammonia build up in that coop. I leave the windows open and clean it out regularly, but it will still knock you over on a hot day. It was bad last night, because they had all had diarrhea. I started putting that limestone down and by the time I was done, they ammonia smell was GONE! I even took the remainder of the bag and spread it in the yard. It works wonders for odor. I am so happy. I didn't use the pure lime, I was afraid it would burn their feet. I used crushed limestone that I got at Orscheliens. It's really cheap, 4$ for a 50lb bag. Even with spreading it in the yard and the coop I didn't use the whole bag. This is going to be a regular staple for me now.
Friday, May 14, 2010
Candling Eggs
Ok, I stole these pictures from http://www.nifty-stuff.com/candling-eggs.php, but so many of us are talking about Candling Eggs, I thought this would be a neat subject for today's post.
Candling is the process of telling if your eggs are fertilized and you should continue to devote incubator space to them. All you need to conduct candling is a dark room and a high powered flashlight. Take one hand and make an "O" out of it. Place the egg on the top of your hand. Put the flashlight under the egg, using the cupped hand to block out any external light. What you should see is something like the following:
 This is an unfertilized store bought egg. Everything is uniform an you can't see any signs of development.
This is a 1 day old fertilized egg. You can see what looks like a yolk formed at one end. This egg will grow into a chicken with the proper temperature and humidity.

This is a two day old fertilized egg. You can already see the development of blood vessels when you candle it and you can see how much it has grown in just 24 hours.

The three day old egg looks remarkably different from the unfertilized egg. The embryo takes up almost the entire interior of the egg now. This chick is well on it's way to hatching. The normal gestational period of an egg is 21 days. This is a great activity to do with your kids. They'll enjoy it and you end up with cute fuzzy chickens.
Thursday, May 13, 2010
What is Free Range?
My chickens are getting ever closer to laying. When I went to get my oldest from a friends house I saw a couple of signs that said "Free Range Eggs". So, I got to wondering, what exactly are Free Range Eggs. I don't keep my chickens in cages, but I do have a fenced run for them. Unfortunately they keep it bare of weeds. Or maybe that fortunate, I don't know. Anyway, Does that qualify?
Turns out it does. According to the USDA, the only requirement to qualify for Free Range is that the chickens have access to the outside. There are stories that some people have qualified with as little as having an open window in their coop where they keep the chickens caged. I always thought of Free Range as having access to open pasture. Unfortunately I can't do that. My baby girl (a pit boxer mix names Jasmine, Jazzy for short.) would snap them up as Jazzy Snacks. There are other neighborhood dogs that would go to town on them too.
So the question comes down to this. Technically I qualify as a Free Range egg person, but do I really feel right in calling them that since they are in a fenced in yard? I haven't come to a decision. I would love to have your input. What do you think I should do?
How to id who is laying eggs
Well, we had band practice last night, so no new work on the plucker. Instead, I will share a neat little trick that I got from our Chicken's 101 group. If you think one of your girls is holding out, how do you tell which one? Take food coloring and put a couple drops in the cloaca of your hens. The hens will lay eggs streaked with the color you put on them. If you have a bunch of chickens, this may take some time, but what an ingenious idea.
Tuesday, May 11, 2010
Starting on the Feather Plate
Oh my gosh. We have 72 holes to drill in our metal plate. I went to the store last night to pick up a metal bit and got sticker shock. I talked with the guy there (amazingly he didn't seem like a Timmy the Toolboy, but actually knew his stuff. I love Menards.) and he directed me to this funky looking bit. It was almost twice as much as the old fashioned bit that I had been looking at. He told me that this one will cut better and stay sharp longer than two of those old fashioned bits. We shall see. I do have to admit, I think the cutting went alot easier than Roger or I either one expected.

 So, tonight more drilling and maybe painting. I have feeling this step is going to take a while.

We drilled a dozen holes in the plate in less than half an hour. Roger even let me do one, and I didn't mess it up. Yeah! Here is a look at what we got accomplished on the plate. There is still alot left to do though.

One word of advice on the bolts. When you are picking up your parts, the book calls for 2" bolts to fasten the pillow block down. My pillow blocks must be thicker. I have to go exchange them for longer bolts today because they just wouldn't work.

Monday, May 10, 2010
The Plucker is Under Way!
My mother's day gift was my husband relenting on helping me with the Chicken Plucker. Or rather I should say letting me help him. I know nothing about carpentry and he taught me a few things last night. We built the frame and got it most of the way painted. I still have to flip it and paint the bottom tonight. He also cut the barrell for me, and came up with a great idea for my feather chute. So, here's what I have learned so far.
When you are screwing in the screws, pay attention to where you place them. It will be important when you go to drill the holes for the carriage bolts. We hit a couple of screws last night when we started the carriage bolt holes. We built the side rails before we attached the legs. When you put the second set of side rails on, if you will screw a couple of temporary screws on the back side at the line where the rail should sit (we were working on it upside down), when you slide it on, they will keep the rail at the right height and make life a whole lot easier.
A saws-all works great for cutting blue barrells. Make the short sides of your frame the same length as the outer diameter of your barrel. 2x4's are not 2"x4". There is actually a 1/4" difference. So when you calculate your long side, add 3 1/2" to your short side measurement. Also, an impact drill makes a HUGE difference when putting in screws (we used deck screws), and if you have the wrench attachment, to screwing down the carriage bolts and the lag screws.
When you put it together you need to pay alot of attention to where the short side and long side are in relation to the board you are attaching. You don't need locking washers for your lag screws. A flat washer will work just fine. We left the bottom of our barrel intact because Roger came up with a great idea for the feather cute. For the feather chute we are going to attach a large drain with the screen removed. He showed me one. It's like what we put in the floor of our garage before they poured the concrete. It will sit almost flush with the bottom and I can put PVC and a flex tube on the bottom to shoot the water and feathers away from the motor and wheels underneath.
And finally, give your spouse lots of love for putting up with your annoying questions and puzzled looks when you don't "get" what your doing. And for having the patience to explain it to you without yelling. I have a very patient husband. I guess that's why we've been married for 21 years this June. LOL.

A view from the left. The closest end is the top of the frame. The far end has the motor mounting boards. We still have the cross boards to mount, but I have to get a hole saw today so we can get that cut out first.

A view from the right. You can see that this is the "open" side of the frame. This will be where our feather chute comes out.

And straight down the center. The excess bolt length on the interior won't interfere since the barrell is round and doesn't go into the corners.

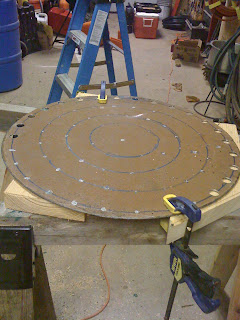
And finally here is the featherplate and barrell, undrilled. The featherplate is made out of the side of an old stove. I took it to a local place called Captial Machine and they slapped it on their plasma cutter. Cost me $20.00 and I have a perfect circle. I was tickeled not to have to cut it out. You local high school ag shop can help too. They often can do it there for free. The one at our high school got broken last year, unfortunately, and has not been repaired yet.
Let me know if I can answer anything else.
Thursday, May 6, 2010
Chicken Saddles! LOL How ingenious
No, it's not a real saddle and it doesn't allow small critters to ride the chicken. One problem I have had with my hens has to do with over amorous roosters. They will rub the feathers off a patch on their back, then the other chickens start picking at the patch making it bigger. I have had some girls with nary a single feather on their butt. The pattern given here comes from Homesteading Today's website. This is a simple Apron type device that straps over the chickens wings and protects her backside. I am definantly going to try it this year.


Great Question from our Chickens-101 Group
Question: I would like some ideas for an affordable chicken coop. I don't have the chickens yet either. I want just a small number because I don't know what I would do with all the eggs! Also, any advice on good chickens for a first timer? Thanks.
Answer: There is a yahoo group call Free Cycle (Sometimes called Re-Use It) where people list things they don't want and will give away if you come pick it up. Here is Missouri they are constantly listing lumber and sheds and the like. That makes building a coop pretty darn easy and cheap if your willing to put in the labor. Chickens will lay almost anywhere. I made my nest boxes out of old milk crates turned on their side with that white wire shelving with the lip cut to fit the bottom to keep the eggs from rolling out. Works great and they are the perfect size.
So what do you do with the eggs? Sell them! Or give them away to friends and neighbors. At $2.00 a carton at the store you will be the most popular person in the office. My best advice for a beginner is to start small, especially if you don't need alot of eggs to start. I started with ten chickens and it worked pretty good. I am up to 25 birds now, mostly because I have two teenage boys to feed. LOL. You will find that they will be very good entertainment in the evenings as you watch them strut around, and if you let them free range, you won't have any more problems with ticks in your yard.
Wednesday, May 5, 2010
Chicken Foot Soup Stock
One of the things we have been talking about on Whizbang is something called Chicken Foot Soup Stock. Some folks use the feet to make dog treats, some use them to make soup stock, I have just been throwing them away.
According to our discussions you scald the feet and peel the skin and toenails off, then add spices, veggies, water, and the feet and boil on low for 24 hours. Then they can or freeze it. They tell me that it's almost like jello when it cools. One fella's wife calls it "Jewish Penicillian".
I would love to know what you do with your chicken feet. Please reply via comment with suggestions and recipies. Thanks a bunch!
Tuesday, May 4, 2010
I made a Yahoo Group!
I realized this weekend that I am very soon going to have four roosters! I am proud and shocked to say that I haven't lost a single animal this year (knock on wood). Part of that goes to compliment Cackle Hatchery here in Lebanon, MO. They gave me good stock. Much better than I would have gotten at one of the big farm stores.
Anyway, I don't want to butcher them, so I created a yahoo group to swap, talk, and learn about chickens here in Mid Mo and everywhere. Check me out at Nikki's Chickens on yahoo groups.
Anyway, I don't want to butcher them, so I created a yahoo group to swap, talk, and learn about chickens here in Mid Mo and everywhere. Check me out at Nikki's Chickens on yahoo groups.
Click to join nikkischickens
Subscribe to:
Comments (Atom)
