Ok, at what point did we become a nation of whusses? I didn't believe my ears this morning when I heard this news story, but it turns out it's true. Bell & Evans is a processing plant in PA that plans to gas chickens, putting them to sleep, before slaughtering them. Yes, they are going to anesthetize the chickens first.
So what pushed this? Who do you think. PETA! These people have no idea what it means to be a production farmer. They are such whimps they won't even drink milk, because it is an abuse of the cow to make it continually produce milk. I urge you to boycott Bell & Evans just for the simple fact that they caved in to PETA of all people. Send your e-mail to them and let them know what you think of thier new method of killing.

Click to join nikkischickens
Friday, October 22, 2010
Sunday, October 3, 2010
Egg Size Chart
This drives me nuts every year. So this year I am putting it on my blog, so I can find it again. Seems like between the time I butcher and the time my new chickens start laying, I lose my egg size chart. So here it is, for the US, grading sizes are:
Modern Sizes (USA)
Modern Sizes (USA)
| Size | Weight | Cooked volume |
| Jumbo | Greater than 2.5 oz. or 71 g | |
| Very Large or Extra-Large (XL) | Greater than 2.25 oz. or 64 g | 56 mL (4 tbsp) |
| Large (L) | Greater than 2 oz. or 57 g | 46 mL (3.25 tbsp) |
| Medium (M) | Greater than 1.75 oz. or 50 g | 43 mL (3 tbsp) |
| Small (S) | Greater than 1.5 oz. or 43 g | |
| Peewee | Greater than 1.25 oz. or 35 g |
Monday, September 20, 2010
Chicken Feeder!
Ok, I did it. Took me about 45 minutes and cost me about 5$ more, but man this is cool. To make this chicken feeder you need a 32 gallon plastic trash can (12.98), A concrete Mixing tray(4.98), Two sticks of all thread (1.79 each), four nuts and four washers (1.00). I spent about 22$ total on this, but it will save ALOT of work for me.


To start, you mark off your quarters. I used the center injection point to mark straight across the bottom of the trash can. Then I used a piece of  paper to get my 90 degree angles.
 paper to get my 90 degree angles.
After you mark it out, drill holes at each of the lines. They should be approximately the same size as your all thread. I used 5/16 inch all thread. Measure down about an inch from the top and then drill through the sides of the can.


Next, mark the center of each side of the concrete tray or tub that you have. Mark your drill point about 2 inches from the top of the tray. This will help keep them from throwing the feed out and wasting it.
Now you mark the sections you are going to cut out. Leave a large strip in the middle. There are no exact measurements for this one. I used the indentations on the bottom of my can as a reference.


Now put the all thread through the bottom, put a washer and nut on one side, pull it snug, lop off the excess with a hack saw, put a washer and a nut on the other side, repeat, and your done!


The only thing that puzzeled me until I built that, was how the food got out. I didn't realize from the other pictures that the trash can is actually held off the bottom of the tub by the all thread. There's about a 2 inch gap between the bottom of the can and the bottom of the tub. That is why you drill four holes in the cross strip and use wire ties to hold it to the all thread. This keeps it from warping under the weight of the feed and allows room for the feed to gravity feed to the bottom tray. His blog said it held 250 lbs of feed, but mine holds three 50lb bags. Maybe his trash can had more room. Just don't overestimate the amount of feed you can hold. Good luck!
Friday, September 17, 2010
Cheap Chicken Feeder! Neat Idea!
If you are like me, you get really tired of trekking out every day to fill up those small feeders. Well this guy did too. He came up with a brilliant idea to create a feeder out of a trash can and a tray, it will hold 250 lbs of feed at a time, and the chickens won't be knocking it over either.
http://www.ajoyfulnoisefarm.com/?p=172
I think I am going to try this and modify it a bit using one of the blue barrells that we use for the plucker. I'll post pics if I do.
http://www.ajoyfulnoisefarm.com/?p=172
I think I am going to try this and modify it a bit using one of the blue barrells that we use for the plucker. I'll post pics if I do.
Thursday, August 26, 2010
More Government Regulation - Oh Joy
The media has whipped people into a frenzy about salmonella and eggs. They are waving the bloody flag of mass plague, destruction, the end of civilization if we don't do something about the egg production in the country. Reminds me of chicken little!
80% of all chicken meat sold in grocery stores has salmonella on it already. Why aren't they screaming and hollering over that and recalling that poultry? Because the fact of the matter is that this bacteria exists in alot of places that you don't think about. So why aren't we all dead? Because if you cook any of these items you destroy the bacteria and make it safe to eat! As long as your not putting raw eggs into your lemon grass organic strawberry smoothie (yes, there is ALOT of sarcasm in that statement!) you aren't going to get sick.
So the government has seen an opportunity to grab more power for itself in relationship to our food supply. They are going to implement more regulations! If they want to implement a regulation that actually works, limit the number of chickens that an organization can have. Top it off at 200,000 or so. Get rid of the huge agri buisnesses and let the food supply chain go back to the local farmers who can produce better eggs with less problems!!!!
Monday, August 23, 2010
Finally! Eggs!
With all of the news lately about Salmonella, I am doubly happy that my chickens have started laying. The first two that I got were both double yolkers! This has turned out the be the best flock I have had so far. The Black Bhramas and Buffs get along very well.
Tuesday, June 15, 2010
Coon Traps
We all have problems with coons eating our chickens. My additional problem is that I have a dog. I love my dog and don't want her to get caught in a traditional trap. I tried using live traps, but once a coon got in, my dog ate the trap to get to the coon.
So I got to looking for a dog safe coon trap. Here is one I came up with.

It's called a lil griz trap. The idea is that you bait it with marshmallows, or some other sweet treat that a coon will like. They reach inside, the trap closes on their arm, and they are stuck until you retrieve them. It only closes as they pull their arm out. A dog can step on it all day and not set it off. Pretty neat little contraption. Here's the link: http://www.wildlifecontrolsupplies.com/Merchant2/merchant.mvc?Screen=PROD&Store_Code=NWS001&Product_Code=WCSGrizz&Category_Code=WCSSS
I have no idea if that's a good price or not. But it's a starting point. Good Luck!
Sunday, June 6, 2010
Racoon leftovers
We have been discussing what can be done with the remnants of a coon kill. One of the gals on Whizbang Chicken Pluckers caught a coon in the act and shot it. Since the kill was fresh, she wanted to know what she could do with it. The overwhealming majority of responses all agreed. Dispose of the carcasses. Use them for coyote bait, burn them, or compost them.
Racoons carry many transmittable diseases like rabies and distemper. It is just not worth the risk to process and cook a coon kill. Usually you find the evidence long after the fact and its far too late then. Never process a sick chicken, roadkilled chicken, or remnants from predation. Chickens are cheap, hospital stays are not.
Racoons carry many transmittable diseases like rabies and distemper. It is just not worth the risk to process and cook a coon kill. Usually you find the evidence long after the fact and its far too late then. Never process a sick chicken, roadkilled chicken, or remnants from predation. Chickens are cheap, hospital stays are not.
Tuesday, June 1, 2010
Time release feeders for weekend getaways
When I was younger I had fish. Whenever I came home from college for the weekend I would put one of those time release feeder floaties in the tank for them so they didn't starve to death. With the long weekend I had the same fear for my chicks and ducks. So I grabbed something that we normally put out for deer and turkey. You can find a Flock Block at any of your local farm stores (TSC, Orscheliens, MFA, etc) or at Bass Pro or Cabela's. I believe they are cheaper at the farm stores, unless you catch them on sale.
These are compressed blocks of cracked corn, sunflower, millett, and all the yummy stuff that chickens, turkeys, and ducks just love to munch on. Before we left I put fresh water in the duck pond and turned the auto waterer on. I filled both feeders with food and put the flock block out in the middle of the pen. We went to Bennet Springs over the holiday and had a blast. Fished, ate, shared adult beverages with friends, went yard saleing, and enjoyed the lunker that my hubby caught. I wondered how they would do while we were partying at Oak Hill and enjoying ourselves.
When we came home Monday night I went out to check them. Both feeders were still over half full! The block was about 3/4 gone, and all my poultry was lazing around in the shade of the run, looking very contented with themseleves. So, I declare the flock block "time release" feed a complete success.
And I have to tell a silly duck story. Of course the duck pond was filthy when we got back. So I washed it out and was filling it up. They are getting used to me because they came down close to watch what I was doing. I changed the hose from stream to spray and they got right up to the edge of the pool. I angled the hose a bit so that the spray would hit them and they were in heaven. I have never seen a duck dance before, but they did! They danced around in the spray and waggled their little butts. I laughed until I cryed they were so funny. We'll have to try that again. I think the boys will enjoy watching them immensely.
I hope everyone had as good a weekend as we did. Good food, good friends, good times.
Tuesday, May 25, 2010
Whoo Hooo! Found a Motor
I had been very down over the last week because I was looking at Motors. A single phase 3/4 HP electric motor is running anywhere from 159.00 to 289.00. That's way outside my budget for this plucker. I didn't know what I was going to do. Fortunately, I am married to a genius!
Last year our A/C broke down and we had to replace the fan and motor. The fan was in shards, but the motor appears to still work. At least my husband got it to working last night. So now I have a motor and the plucker project can continue.
We made great progress on it over the last week. I say "We", but Roger and the boys have done most of the hard work. Pulling those fingers through the body and the featherplate are a booger! I still have to order some more fingers, but we should be closing in. It's a good thing too. One of our friends is ready for it to make it's debut.
Thursday, May 20, 2010
The wonders of crushed limestone
My chicks got sick this week. I lost one of my Black Bhramas and the others were all having very loose watery white filled stools. Everyone on the groups agreed that it was probably Coccidosis and that if I didn't do something quick I would lose about half of them. They told me to clean the coop out, put down a layer of powdered lime, and fresh hay. So that is exactly what I did. I also stopped by Tractor Supply and got a new water jug and took away their auto waterer. Even putting it up on the tire in the pen didn't keep the silly ducks out of it, and I'm pretty sure that is what got them sick in the first place.
So they are all doing better now, but I have to express my joy and amazement at finding crushed limestone. Ever since I raised those Cornish Cross, I have had a problem with ammonia build up in that coop. I leave the windows open and clean it out regularly, but it will still knock you over on a hot day. It was bad last night, because they had all had diarrhea. I started putting that limestone down and by the time I was done, they ammonia smell was GONE! I even took the remainder of the bag and spread it in the yard. It works wonders for odor. I am so happy. I didn't use the pure lime, I was afraid it would burn their feet. I used crushed limestone that I got at Orscheliens. It's really cheap, 4$ for a 50lb bag. Even with spreading it in the yard and the coop I didn't use the whole bag. This is going to be a regular staple for me now.
So they are all doing better now, but I have to express my joy and amazement at finding crushed limestone. Ever since I raised those Cornish Cross, I have had a problem with ammonia build up in that coop. I leave the windows open and clean it out regularly, but it will still knock you over on a hot day. It was bad last night, because they had all had diarrhea. I started putting that limestone down and by the time I was done, they ammonia smell was GONE! I even took the remainder of the bag and spread it in the yard. It works wonders for odor. I am so happy. I didn't use the pure lime, I was afraid it would burn their feet. I used crushed limestone that I got at Orscheliens. It's really cheap, 4$ for a 50lb bag. Even with spreading it in the yard and the coop I didn't use the whole bag. This is going to be a regular staple for me now.
Friday, May 14, 2010
Candling Eggs
Ok, I stole these pictures from http://www.nifty-stuff.com/candling-eggs.php, but so many of us are talking about Candling Eggs, I thought this would be a neat subject for today's post.
Candling is the process of telling if your eggs are fertilized and you should continue to devote incubator space to them. All you need to conduct candling is a dark room and a high powered flashlight. Take one hand and make an "O" out of it. Place the egg on the top of your hand. Put the flashlight under the egg, using the cupped hand to block out any external light. What you should see is something like the following:
 This is an unfertilized store bought egg. Everything is uniform an you can't see any signs of development.
This is a 1 day old fertilized egg. You can see what looks like a yolk formed at one end. This egg will grow into a chicken with the proper temperature and humidity.

This is a two day old fertilized egg. You can already see the development of blood vessels when you candle it and you can see how much it has grown in just 24 hours.

The three day old egg looks remarkably different from the unfertilized egg. The embryo takes up almost the entire interior of the egg now. This chick is well on it's way to hatching. The normal gestational period of an egg is 21 days. This is a great activity to do with your kids. They'll enjoy it and you end up with cute fuzzy chickens.
Thursday, May 13, 2010
What is Free Range?
My chickens are getting ever closer to laying. When I went to get my oldest from a friends house I saw a couple of signs that said "Free Range Eggs". So, I got to wondering, what exactly are Free Range Eggs. I don't keep my chickens in cages, but I do have a fenced run for them. Unfortunately they keep it bare of weeds. Or maybe that fortunate, I don't know. Anyway, Does that qualify?
Turns out it does. According to the USDA, the only requirement to qualify for Free Range is that the chickens have access to the outside. There are stories that some people have qualified with as little as having an open window in their coop where they keep the chickens caged. I always thought of Free Range as having access to open pasture. Unfortunately I can't do that. My baby girl (a pit boxer mix names Jasmine, Jazzy for short.) would snap them up as Jazzy Snacks. There are other neighborhood dogs that would go to town on them too.
So the question comes down to this. Technically I qualify as a Free Range egg person, but do I really feel right in calling them that since they are in a fenced in yard? I haven't come to a decision. I would love to have your input. What do you think I should do?
How to id who is laying eggs
Well, we had band practice last night, so no new work on the plucker. Instead, I will share a neat little trick that I got from our Chicken's 101 group. If you think one of your girls is holding out, how do you tell which one? Take food coloring and put a couple drops in the cloaca of your hens. The hens will lay eggs streaked with the color you put on them. If you have a bunch of chickens, this may take some time, but what an ingenious idea.
Tuesday, May 11, 2010
Starting on the Feather Plate
Oh my gosh. We have 72 holes to drill in our metal plate. I went to the store last night to pick up a metal bit and got sticker shock. I talked with the guy there (amazingly he didn't seem like a Timmy the Toolboy, but actually knew his stuff. I love Menards.) and he directed me to this funky looking bit. It was almost twice as much as the old fashioned bit that I had been looking at. He told me that this one will cut better and stay sharp longer than two of those old fashioned bits. We shall see. I do have to admit, I think the cutting went alot easier than Roger or I either one expected.

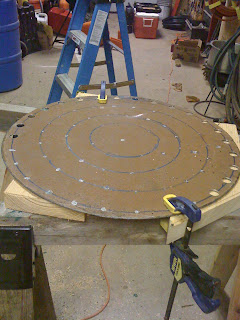
 So, tonight more drilling and maybe painting. I have feeling this step is going to take a while.

We drilled a dozen holes in the plate in less than half an hour. Roger even let me do one, and I didn't mess it up. Yeah! Here is a look at what we got accomplished on the plate. There is still alot left to do though.

One word of advice on the bolts. When you are picking up your parts, the book calls for 2" bolts to fasten the pillow block down. My pillow blocks must be thicker. I have to go exchange them for longer bolts today because they just wouldn't work.

Monday, May 10, 2010
The Plucker is Under Way!
My mother's day gift was my husband relenting on helping me with the Chicken Plucker. Or rather I should say letting me help him. I know nothing about carpentry and he taught me a few things last night. We built the frame and got it most of the way painted. I still have to flip it and paint the bottom tonight. He also cut the barrell for me, and came up with a great idea for my feather chute. So, here's what I have learned so far.
When you are screwing in the screws, pay attention to where you place them. It will be important when you go to drill the holes for the carriage bolts. We hit a couple of screws last night when we started the carriage bolt holes. We built the side rails before we attached the legs. When you put the second set of side rails on, if you will screw a couple of temporary screws on the back side at the line where the rail should sit (we were working on it upside down), when you slide it on, they will keep the rail at the right height and make life a whole lot easier.
A saws-all works great for cutting blue barrells. Make the short sides of your frame the same length as the outer diameter of your barrel. 2x4's are not 2"x4". There is actually a 1/4" difference. So when you calculate your long side, add 3 1/2" to your short side measurement. Also, an impact drill makes a HUGE difference when putting in screws (we used deck screws), and if you have the wrench attachment, to screwing down the carriage bolts and the lag screws.
When you put it together you need to pay alot of attention to where the short side and long side are in relation to the board you are attaching. You don't need locking washers for your lag screws. A flat washer will work just fine. We left the bottom of our barrel intact because Roger came up with a great idea for the feather cute. For the feather chute we are going to attach a large drain with the screen removed. He showed me one. It's like what we put in the floor of our garage before they poured the concrete. It will sit almost flush with the bottom and I can put PVC and a flex tube on the bottom to shoot the water and feathers away from the motor and wheels underneath.
And finally, give your spouse lots of love for putting up with your annoying questions and puzzled looks when you don't "get" what your doing. And for having the patience to explain it to you without yelling. I have a very patient husband. I guess that's why we've been married for 21 years this June. LOL.

A view from the left. The closest end is the top of the frame. The far end has the motor mounting boards. We still have the cross boards to mount, but I have to get a hole saw today so we can get that cut out first.

A view from the right. You can see that this is the "open" side of the frame. This will be where our feather chute comes out.

And straight down the center. The excess bolt length on the interior won't interfere since the barrell is round and doesn't go into the corners.

And finally here is the featherplate and barrell, undrilled. The featherplate is made out of the side of an old stove. I took it to a local place called Captial Machine and they slapped it on their plasma cutter. Cost me $20.00 and I have a perfect circle. I was tickeled not to have to cut it out. You local high school ag shop can help too. They often can do it there for free. The one at our high school got broken last year, unfortunately, and has not been repaired yet.
Let me know if I can answer anything else.
Thursday, May 6, 2010
Chicken Saddles! LOL How ingenious
No, it's not a real saddle and it doesn't allow small critters to ride the chicken. One problem I have had with my hens has to do with over amorous roosters. They will rub the feathers off a patch on their back, then the other chickens start picking at the patch making it bigger. I have had some girls with nary a single feather on their butt. The pattern given here comes from Homesteading Today's website. This is a simple Apron type device that straps over the chickens wings and protects her backside. I am definantly going to try it this year.


Great Question from our Chickens-101 Group
Question: I would like some ideas for an affordable chicken coop. I don't have the chickens yet either. I want just a small number because I don't know what I would do with all the eggs! Also, any advice on good chickens for a first timer? Thanks.
Answer: There is a yahoo group call Free Cycle (Sometimes called Re-Use It) where people list things they don't want and will give away if you come pick it up. Here is Missouri they are constantly listing lumber and sheds and the like. That makes building a coop pretty darn easy and cheap if your willing to put in the labor. Chickens will lay almost anywhere. I made my nest boxes out of old milk crates turned on their side with that white wire shelving with the lip cut to fit the bottom to keep the eggs from rolling out. Works great and they are the perfect size.
So what do you do with the eggs? Sell them! Or give them away to friends and neighbors. At $2.00 a carton at the store you will be the most popular person in the office. My best advice for a beginner is to start small, especially if you don't need alot of eggs to start. I started with ten chickens and it worked pretty good. I am up to 25 birds now, mostly because I have two teenage boys to feed. LOL. You will find that they will be very good entertainment in the evenings as you watch them strut around, and if you let them free range, you won't have any more problems with ticks in your yard.
Wednesday, May 5, 2010
Chicken Foot Soup Stock
One of the things we have been talking about on Whizbang is something called Chicken Foot Soup Stock. Some folks use the feet to make dog treats, some use them to make soup stock, I have just been throwing them away.
According to our discussions you scald the feet and peel the skin and toenails off, then add spices, veggies, water, and the feet and boil on low for 24 hours. Then they can or freeze it. They tell me that it's almost like jello when it cools. One fella's wife calls it "Jewish Penicillian".
I would love to know what you do with your chicken feet. Please reply via comment with suggestions and recipies. Thanks a bunch!
Tuesday, May 4, 2010
I made a Yahoo Group!
I realized this weekend that I am very soon going to have four roosters! I am proud and shocked to say that I haven't lost a single animal this year (knock on wood). Part of that goes to compliment Cackle Hatchery here in Lebanon, MO. They gave me good stock. Much better than I would have gotten at one of the big farm stores.
Anyway, I don't want to butcher them, so I created a yahoo group to swap, talk, and learn about chickens here in Mid Mo and everywhere. Check me out at Nikki's Chickens on yahoo groups.
Anyway, I don't want to butcher them, so I created a yahoo group to swap, talk, and learn about chickens here in Mid Mo and everywhere. Check me out at Nikki's Chickens on yahoo groups.
Click to join nikkischickens
Friday, April 30, 2010
A new ramp for the ducks
My fat little ducks can't get their butts into the pool. I stopped and picked up some of the flat slate that is so abundant in the bluffs here in mid Missouri, but they just couldn't get up them. So, I went to Menards. OMG! I could get in alot of trouble at that place. They have Everything! I found some 1x2 wire shelving that you use for garage shelves and I got two. They were about 3$ each. Then I got a 6$ utility rug like they use in resteraunts. When I got home I cut the rug to fit each grid. Then I used wire ties to secure the rug to the grids and the grids to each other at the short end. It makes a perfect ramp in and out of the pool. They are finally getting into it. Yeah!
Louey update -- two days and no flipping. Maybe he's getting more coordinated. LOL
Louey update -- two days and no flipping. Maybe he's getting more coordinated. LOL
Thursday, April 29, 2010
Loopy Louey (Or Louise)
That silly duck was on his back again. (I'm assuming a he for now) I've decided to call it Loop Louey (or Louise if it turns out to be a hen). I don't know what to do with this poor thing. Every day it's on it's back. I know it's been there for an extended time because the first thing it does is run to the water dish and drink. I'm really worried that the poor little guy is going to get dehydrated one of these days. What can I do?
Wednesday, April 28, 2010
Outside at Last
Last night my son and I got in the coop and scooped all their little butts outside. Once we got the ducks out the rest followed easier. The ducks found the auto waterer and were in heaven. They splashed and washed and swam. LOL The chicks were enthralled with the tall grass at the side of the pen. I had to go out and scoop them all back into the coop at dark because the little nit wits were roosting outside. This morning when I opened the door though, they all came piling out and headed for the waterer.
I also planted an herb garden at the foot of the cage where we shortened it by about 4 feet when we rebuilt. We made it alot wider though. We'll see how the fertile ground does with the herbs.

I also planted an herb garden at the foot of the cage where we shortened it by about 4 feet when we rebuilt. We made it alot wider though. We'll see how the fertile ground does with the herbs.

Tuesday, April 27, 2010
Swamping the house
My least favorite job is swamping out the coop. These little guys don't want to go outside and they are soiling their hay every other day. Plus, my auto waterer developed a leak, so now I have real mess. I put the auto waterer back outside, but the two small regular waterers that I have don't contain enough to get them through the day. Man those ducks eat and drink alot!
I left the babies inside while I cleaned, shooing them from one side to the other. They were a bit distressed, but we made it work. I can't believe how cold it has been. I turned their heat lamp back on because I was concerned about the temp drop. One of my ducks flipped over again. Poor thing was just laying there wriggling his little butt looking at me. It's supposed to be a bit warmer tommorow. I may try to shoo them outside in the morning based on advice I got from some of the Whizbangers.
I left the babies inside while I cleaned, shooing them from one side to the other. They were a bit distressed, but we made it work. I can't believe how cold it has been. I turned their heat lamp back on because I was concerned about the temp drop. One of my ducks flipped over again. Poor thing was just laying there wriggling his little butt looking at me. It's supposed to be a bit warmer tommorow. I may try to shoo them outside in the morning based on advice I got from some of the Whizbangers.
Saturday, April 24, 2010
Fence Fixed but still no help
Well, I fixed the problem of tiny chicks walking thorugh the fence today. I took large black trash bags and cut them into 12" strips, taped them together with strapping tape, created reinforcements with strapping tape, paper punched them, and used twist ties and staples to attach them all around the bottom of the pen. This creates a barrier about 1 1/5 feet high that they won't try to go through.
My dilemma is still here however. They are pooing inside the house and won't come out. I really need to clean it out. Do I give them time and let them come outside on their own, or do I shoo them out tomorrow and clean it? Any suggestions?

My dilemma is still here however. They are pooing inside the house and won't come out. I really need to clean it out. Do I give them time and let them come outside on their own, or do I shoo them out tomorrow and clean it? Any suggestions?

Friday, April 23, 2010
Cornish Cross - To Raise or Not To Raise
Our current topic of discussion seems to be whether or not to raise Cornish Cross chickens. Cornish Cross from the hatchery get very big very fast. Mine grew so fast that they just didn't move. I think it was leg problems. Some of them definantely had feet problems. I know that they sure poo alot more than standard breed chickens. I bet I had to clean six inches out of the coop after we butchered.
One tip that I didn't know about was to remove their food at night. Apparently they will eat all night if you don't. That contributes to their weight gain and their leg problems. I know that I will not raise them again unless I either have my plucker built so that I can butcher myself, or I have a processor lined up to do it. Last time my processor backed out on me. They were 12 weeks old by the time we got them to a butcher. One, I kid you not, weighed 12 lbs. It looked like a small turkey. When we say they get big, we mean it.
Since they have such a fast growth rate and short lifespan, a temporary cage is not a bad thing to set up. Pick that bald spot in the yard and let them fertilize it for you. LOL. They really can't fly because of their weight. I think a standard dog kennel or 3' tall fencing would be fine to make a temporary coop. Make sure they have plenty of water and enough room to move around if they want to.
When they hit the 3-5 lb range, don't hesitate. Butcher them then and there. From that point forward it just goes downhill. After I get my plucker built I will probably raise another batch, but not until then.
Let me know your thoughts.
Thursday, April 22, 2010
A great resource
If you are into chickens, and turkeys, and ducks, then you should join our Yahoo News Group... Whizbang Chicken Pluckers. http://tech.groups.yahoo.com/group/whizbangchickenpluckers/ This site has been a godsend. These folks are all about raising poultry small scale for fun and profit. There is nothing like raising your own food and putting it in the freezer. I am getting ready to build my chicken plucker. I'll put posts up as I make progress. Wish me luck.
![]()
Click to join whizbangchickenpluckers
Click to join whizbangchickenpluckers
My first Post
Wow, what a rainy dreary day. But my ducks are happy. This is my first time for raising ducks. I went to the coop yesterday and one of the poor little things had flipped over on it's back. It couldn't get itself turned over. I never knew their wings would be so small and them so big. It was funny, but I felt sorry for the little guy. They are just so cute. If you have any advice on raising ducks, feel free to contribute.
Subscribe to:
Comments (Atom)
